Everything Fhenix Pay does, in one place
Fhenix Pay is a self-custodial mobile wallet for confidential payments. Hold tokens whose amounts are encrypted on-chain, send them to an address, a friend, a QR, an NFC tag, or a nearby device over Bluetooth, move value between public and private with shield / unshield, let an auditor or accountant read your confidential data with a revocable permit, browse Fhenix dApps and the confidential explorer in-app, sign with a Ledger hardware wallet, and pair with dApps in your desktop browser, all powered by Fhenix CoFHE.
01Overview
On a normal blockchain every balance and every transfer amount is public. Fhenix Pay works with tokens built on fully homomorphic encryption (FHE): the amounts live on-chain as ciphertext, the token contract adds and subtracts numbers it cannot read, and only you can decrypt your own balance. In practice that means you can pay someone in front of a block explorer and it will show that you paid, never how much.
Three ideas carry the whole app:
- Confidential balances. A token's encrypted balance is “unsealed” only on your phone, using a signed permit and a local sealing key. The chain, the RPC node, and Fhenix never see the plaintext number.
- Token kinds. Dual-mode tokens (fUSD, FIX) hold a public and a confidential balance in one contract. FHERC20 wrappers (cUSDC) wrap a plain ERC20 into a confidential-only token. Plain ERC-20s work too; they're just public.
- Self-custody. Keys are generated on the device, stored OS-encrypted, and never leave it. There is no account, no server, and no one to call if you lose the recovery phrase. Write it down.
02Installation
iOS
Fhenix Pay ships through TestFlight. Join the TestFlight beta on your iPhone, install the TestFlight app if prompted, and accept the invitation.
Android
Install from Google Play.
First launch
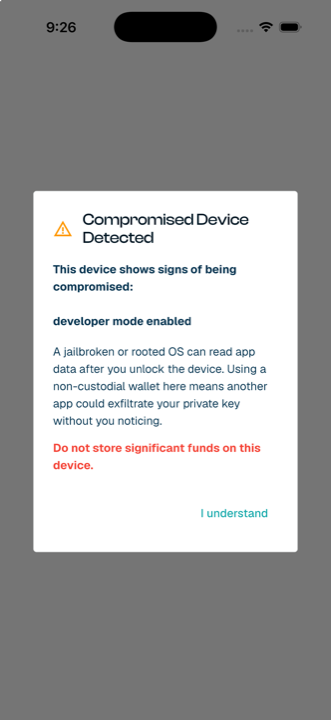
On launch the app runs a device-integrity check. If the device is jailbroken / rooted or has developer mode enabled, you'll see a warning before any wallet is created. You can proceed, but don't keep meaningful funds on such a device. Once a wallet exists, opening the app always requires Face ID, fingerprint, or your device passcode, and so does coming back to it after more than a minute in the background.
03Quick start: first token in five steps
Create a wallet
Open the app, name your wallet, and tap Create a new wallet. Write down the 12-word recovery phrase; the app will make you prove you did.
Check the network
The app starts on Arbitrum Sepolia, home of the Fhenix testnet tokens. Tap the network name on the portfolio card to switch.
Find your confidential tokens
The Fhenix tokens (fUSD, cUSDC…) come built in and appear in Assets automatically. For anything else, tap + Add and paste the contract address; the app detects what kind of token it is.
Fund & shield
Get testnet tokens from a faucet, then tap Shield to move them into your confidential balance.
Pay someone
Tap Send and scan their payment QR. The amount is encrypted on your phone before the transaction is sent.
04The interface
The app is organized into five tabs on a bottom navigation bar, and each keeps its state as you switch.
- Wallet: the home screen, with portfolio, quick actions, and your assets. Where you'll spend most of your time.
- Access: who can read your confidential data, and what others have shared with you (§13).
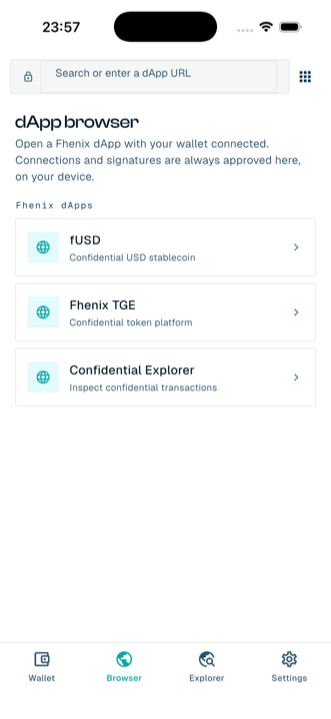
- Browser: an in-app dApp browser with your wallet built in (§14).
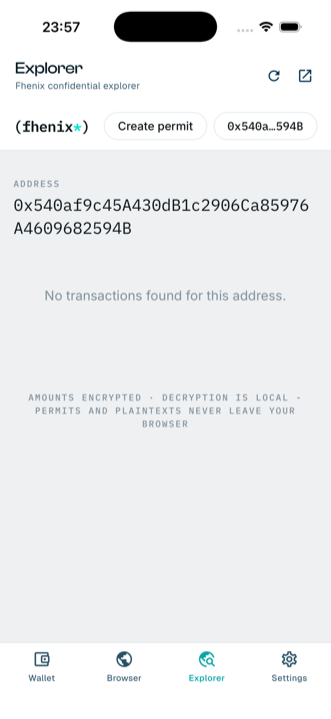
- Explorer: the Fhenix Confidential Explorer, opened on your own address (§14).
- Settings: wallet backup, friends, hardware wallet, appearance, and the danger zone.
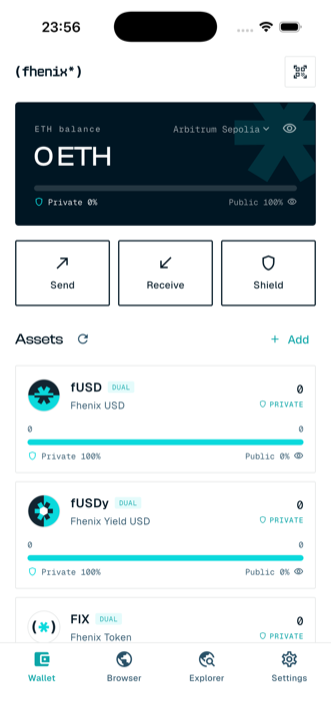
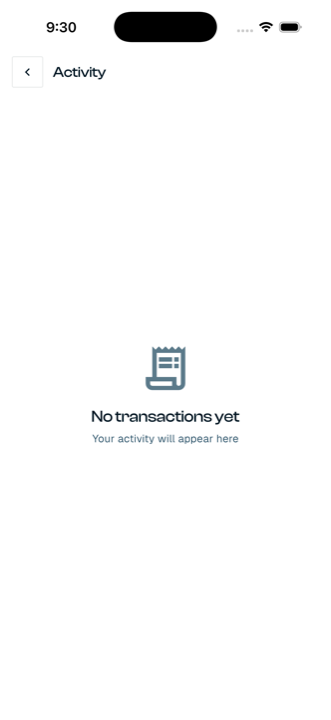
- Header icons: scan (pair with a web dApp, §15) and activity history.
- Portfolio card: your total in USD, the network selector, a visibility toggle that hides all balances, and the private/public split bar.
- Quick actions: Send, Receive, and Shield.
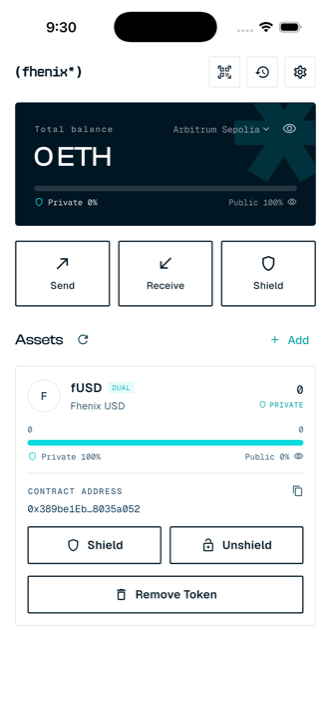
- Assets: one card per token with its kind tag (DUAL / FHERC20 / ERC-20). Tap a card to expand it for the contract address and per-token Shield / Unshield actions (and Remove, for tokens you added yourself).
- Appearance: the app follows your system theme by default; switch between Auto / Light / Dark in Settings.
05Wallet setup
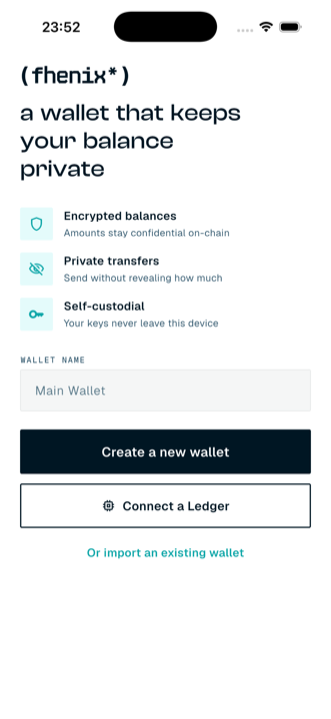
The welcome screen offers three ways in: create a fresh wallet (the default), Connect a Ledger to use a hardware wallet with no key on the phone (§06), or the “Or import an existing wallet” link for a recovery phrase or private key.
Create a new wallet
Enter a wallet name and tap Create a new wallet. The app generates a 12-word recovery phrase and shows it once, on a screen that blocks screenshots and screen recording. Write the words down on paper, in order. You must then re-select several of the words to prove you saved them before the wallet opens.
Import an existing wallet
Tap “Or import an existing wallet”, switch the toggle to Recovery Phrase and paste your 12/24 words, or to Private Key and paste a 0x… key, then tap Import wallet.
Back up, inspect, delete
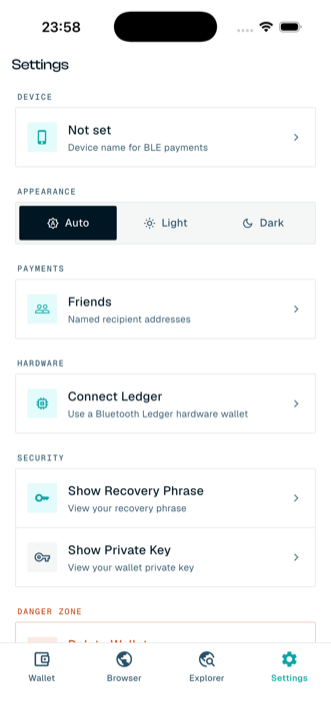
In Settings → Security you can re-display the recovery phrase or the raw private key (both behind biometric auth, both on screenshot-blocked screens, and anything you copy is cleared from the clipboard after 30 seconds). Delete Wallet erases everything the app keeps on the phone: the keys, activity history, friends, added tokens, saved dApps and their logins, and any permits. Paired dApps are disconnected. It does not touch anything on-chain, and reinstalling the app does not bring the wallet back. Only your recovery phrase does. Settings is also where you manage Friends (your address book, §10), connect a Ledger (§06), and switch the app theme between Auto, Light, and Dark.
06Ledger hardware wallet
Fhenix Pay can run entirely from a Bluetooth Ledger. The private key lives in the Ledger's secure element and never touches the phone: every permit and every transaction is confirmed physically on the device. Supported models are the Bluetooth-capable Ledgers: Nano X, Nano Gen5, Stax, and Flex.
Before you connect
- On the Ledger: unlock it, enable Bluetooth, and open the Ethereum app.
- In the Ethereum app's settings, enable Blind signing. CoFHE permits and confidential transactions aren't in Ledger's clear-signing catalog, so the device shows a hash instead of decoded fields (see “What you sign” below).
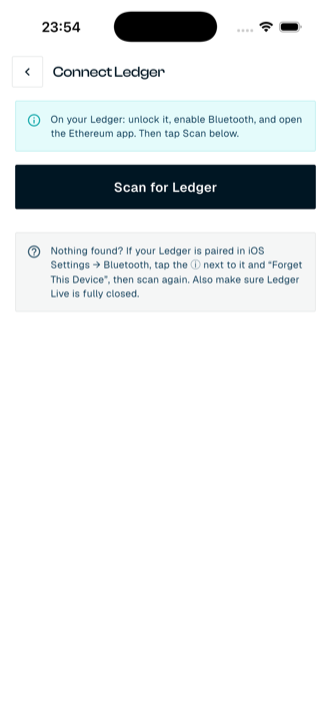
- Fully close Ledger Live, and if the Ledger is paired in the OS's Bluetooth settings, forget it there. Both can hold the connection and hide the device from the app.
Connecting
Open the connect flow
From onboarding tap Connect a Ledger, or on an existing install go to Settings → Hardware → Connect Ledger.
Scan and pick your device
Tap Scan for Ledger. Ledgers already connected to the phone are listed immediately; advertising ones appear as they're found. Tap yours to connect and the app reads the Ethereum address from the device.
Verify the address on the Ledger
The app shows the address and asks the Ledger to display it too. Compare them character by character and approve on the device. Use this Ledger as my wallet stays disabled until you do; this is what guarantees funds sent to you really reach your Ledger. If you reject it, tap Verify address on Ledger to try again.
Use it as your wallet
Tap Use this Ledger as my wallet. The home screen opens on the Ledger account: balances, confidential unsealing, sending, shielding: everything works the same, except signatures happen on the Ledger.
You can re-check the address at any time: on a Ledger wallet, the address row on the home screen and the Receive screen both have a Verify on Ledger action.
What you sign
Whenever a signature is needed, the app shows a “Confirm on your Ledger” overlay that spells out in plain words what you are approving: a decryption permit for reading your own balances, or a transaction with its recipient and amount. Because these are blind signatures, the Ledger's screen shows a hash rather than decoded fields, so only approve when you triggered the action in Fhenix Pay yourself. Permits are cached (§09), so day-to-day you sign far less often than you'd expect.
Reconnecting
The link doesn't need to be babysat. After an app restart, a dropped Bluetooth connection, or the Ledger going to sleep, the next action that needs a signature pops a reconnect dialog that finds your saved device again. Unlock the Ledger, open the Ethereum app, and it reconnects and continues. If a signature fails because the device was locked, unlock it and simply retry the action.
07Networks
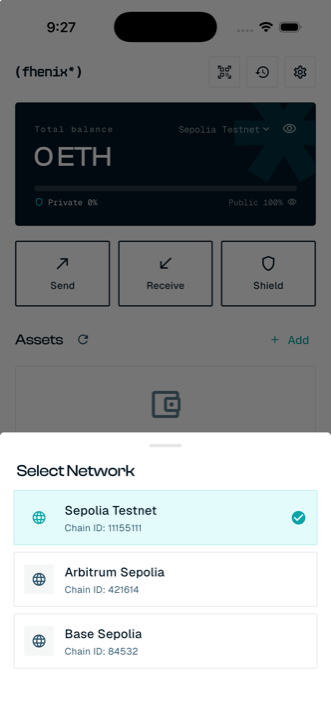
Tap the network name on the portfolio card to switch. Tokens, balances, and activity are tracked per network.
| Network | Chain ID | Notes |
|---|---|---|
| Sepolia Testnet | 11155111 | CoFHE-enabled L1 testnet |
| Arbitrum Sepolia | 421614 | Default on first launch, and home of the Fhenix testnet tokens (fUSD, cUSDC…) |
08Tokens
Built-in tokens
The Fhenix testnet tokens (fUSD, cUSDC, FIX…) come built in, so they appear in Assets without any setup. Their contract addresses ship inside the app itself, so nothing downloaded later can swap one for a lookalike; tokens newly added to the Fhenix token list still show up automatically.
Adding a token
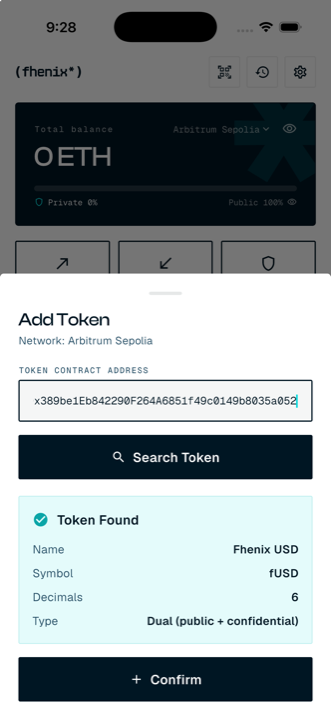
For anything not on the list, tap + Add next to Assets, paste the contract address, and tap Search Token. The app reads the token's name, symbol, and decimals, and probes the contract to detect what kind of token it is. Review the card and tap Confirm.
Token kinds
| Tag | Kind | What it means |
|---|---|---|
DUAL | Dual-mode confidential token | One contract with both a public ERC20 balance and an encrypted balance. Shield/unshield moves value between the two. Examples: fUSD, FIX. |
FHERC20 | Confidential wrapper | A confidential-only token wrapping a plain ERC20 underlying (cUSDC wraps USDC). Shield deposits the underlying; unshield releases it back. |
ERC-20 | Plain public token | A normal token with a public balance. No confidential features, no split bar. |
Managing tokens
Tap a token card to expand it: you'll see the contract address (tap the copy icon to copy it), Shield / Unshield for confidential kinds, and (for tokens you added yourself) Remove Token. Built-in tokens can't be removed. Removing a token only removes it from the list; your balance stays on-chain and comes back if you re-add the address.
09Balances & privacy
A confidential balance arrives from the chain as an encrypted handle. To show you the number, the app asks the CoFHE network to seal it to your device, then decrypts it locally with a key that never leaves the phone. You'll briefly see loading dots on a token card while that happens.
- Unsealing is authorized by a permit: a signed message proving you own the address. Permits are cached so you aren't asked to sign on every refresh.
- Dual tokens show both sides at once: the split bar has the private amount on the left, public on the right, with real numbers above each side.
- The eye icon on the portfolio card hides every amount on screen, useful when someone is watching.
- Totals and per-token values are priced in USD via live rates.
10Sending
Tap Send on the home screen and pick how to reach the person you're paying. In every flow the amount is encrypted on your phone before the transaction is signed; the network only ever sees ciphertext.
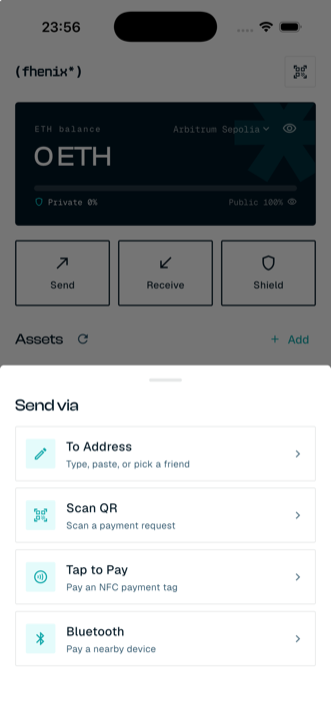
To Address
The classic flow: type or paste a 0x… address (or pick a friend), then choose the token and amount and review on the confirmation screen.
Friends
Friends is the app's address book: save the addresses you pay often under a name, and they're one tap away in the send flow. Manage the list in Settings → Friends: add, rename, copy an address, or remove.
Scan QR
Point the camera at a Fhenix Pay payment request (see §11). The confirmation screen shows the recipient, token, and amount; approve and the app encrypts the amount, sends the confidential transfer, and records it in Activity.
Tap to Pay (NFC)
Tap Tap to Pay, then hold your phone against an NFC payment tag (a sticker, a terminal, or another phone sharing a request as a tag). The payment request loads straight into the confirmation screen. If a tag is read while you weren't paying, the app doesn't jump into a payment: it shows a Review notice you can open or ignore.
Bluetooth
Pays a nearby Fhenix Pay device directly. The other side opens Receive → shares via Bluetooth; your side scans for nearby devices and connects. Works with no camera and no typed addresses.
Confirming a payment
Every flow ends on the same confirmation screen, and it only trusts what it can check itself:
- The amount is shown with the token's own symbol and decimals, read from the token contract, not with whatever the QR, tag, or nearby device claimed. If the request described the amount differently, a red Check the amount warning appears; the number on screen is what will actually be sent.
- The recipient is shown as the full address. The first time you pay an address on a network, you type its last 6 characters to confirm it.
- Sliding to pay asks for Face ID / fingerprint / passcode (on a Ledger wallet you confirm on the device instead).
11Receiving
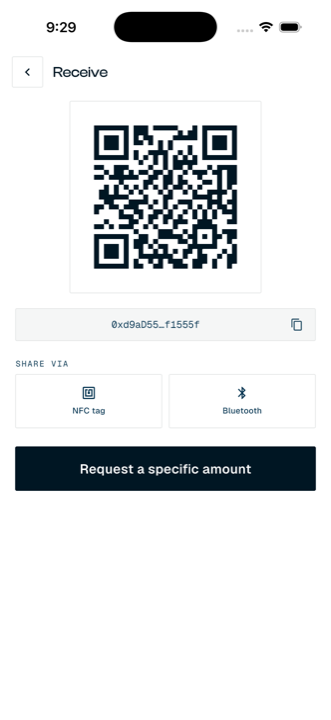
- Wallet QR: the default code encodes your address; any sender can scan it.
- Copy address: tap the address chip to copy the full
0x…address. - Request a specific amount: build a payment request naming the token and amount; the sender's confirmation screen is pre-filled.
- Share via NFC or Bluetooth: present the request as an NFC tag for tap-to-pay, or advertise it to nearby devices over Bluetooth.
12Shield & unshield
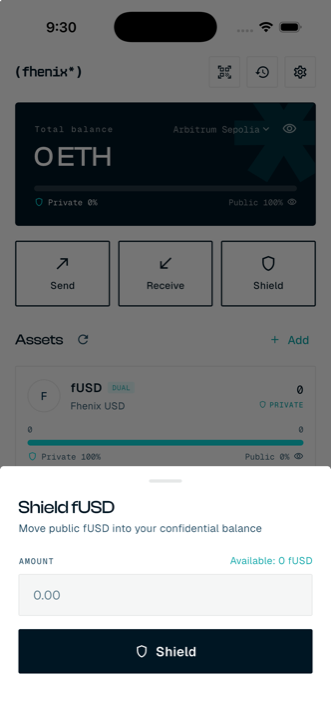
Shielding converts public balance into confidential balance; unshielding converts it back. Reach it from the Shield quick action (pick a token) or from the buttons on an expanded token card.
Shielding
- Dual tokens shield in place: the amount moves from your public balance into the encrypted one in a single transaction. No approval needed: one authentication and you're done.
- FHERC20 wrappers deposit the underlying token (e.g. USDC into cUSDC). The app first checks on-chain that the wrapper really wraps that token. If an ERC20 approval is needed, it shows an Approve screen with the token, the full address of the contract being approved, and the amount; after you confirm and authenticate, it approves, then asks you to authenticate once more for the shield itself.
Unshield and claim each ask for authentication too. Nothing that moves your tokens is ever signed silently.
Unshielding: two steps by design
Burn confidentially
The amount is deducted from your encrypted balance and a claim is opened on-chain. At this point no one (including the contract) knows the plaintext amount.
Claim publicly
The CoFHE threshold network decrypts the burned amount and produces a proof. The app submits the claim and the tokens land in your public balance (dual) or as the underlying token (wrapper). This usually takes under a minute; the app claims automatically, and if you close the sheet early a Claim banner stays on the token card until it's done.
13Shared access
Your confidential balances are unreadable by default to everyone, Fhenix included. The Access tab lets you choose who else may read them: an auditor, an accountant, a business partner. You give them a permit: a signed, read-only grant that expires on its own and that you can revoke. A permit lets someone read; it never lets anyone move your funds.
The tab has two sides: Who can view (permits you have given) and Shared with me (permits others have given you).
Giving someone access
Start a permit
In Access → Who can view, tap Delegate permit. Enter the recipient's full
0x…address (or scan it) and, optionally, a name to remember it by.Choose what they can see
Balances shares the private balance of the tokens you tick. Transactions shares only the amounts of specific transactions you pick from your history, useful for proving a single payment.
Choose live or frozen
Updates as data changes lets them follow your balance and every future change until the permit ends. Frozen when you sign shows only the values as they are right now.
Pick an expiry and sign
Choose 1 day, 1 week, 1 month, 6 months, or a custom length of up to 365 days, then tap Sign and create permit. A final Sign this permit? screen spells out the full recipient address, every token contract, the expiry, and whether it can be revoked. Check them, then authenticate.
Handing it over
- QR code or file (recommended): show the QR, or share the permit as a file or copied text. It holds no secret: only the recipient's own wallet can use it, and the share stays between the two of you.
- Post on-chain (public): puts the permit straight into the recipient's inbox in Fhenix Pay. This is a transaction and costs gas, and it is public and permanent: anyone can see that you share with this recipient, which tokens, and until when. Your balances themselves stay encrypted.
Checking and revoking
Tap a permit under Who can view to see its details. View what they see decrypts exactly what the recipient can read, on your phone and in memory only. Revoke access cuts them off with an on-chain transaction (it costs gas and takes effect from the next block); Reissue creates a fresh permit with the same settings.
When someone shares with you
Permits posted to you on-chain appear under Shared with me; accept one by signing. For a permit sent as a QR or file, use Add a permit manually to scan the code or paste the text. Before accepting, the app checks that the permit was really signed by the address it claims to come from and that it belongs to the current network. Then tap Decrypt and view for a read-only view of what was shared. It tells you when a permit has expired or been revoked.
14Explorer & dApp browser
Two tabs bring the Fhenix web ecosystem into the app, with your wallet already connected: no pairing, no browser extension.
Explorer
The Explorer tab embeds the Fhenix Confidential Explorer, opened directly on your own address. Because it runs inside the wallet, it can do what a public explorer can't: after you approve a decryption permit, it shows your own confidential amounts decrypted, while everyone else looking at the same transactions still sees ciphertext. Links that lead to other sites open in your phone's regular browser, outside the wallet.
dApp browser
The Browser tab loads web dApps with Fhenix Pay injected as the wallet (an EIP-1193 provider), so CoFHE-aware dApps can connect, request permits, and ask for signatures, each one approved by you in the app. It opens on a shortcut to the Confidential Explorer and the dApps you've saved: tap Add a dApp (or Add this page while browsing) to keep one, and use the URL bar for anything else.
- Only secure
https://sites open; plainhttp://, file, and script addresses are refused. - A site must be approved once before it can see your address or ask for a signature. Only the Explorer tab's own site connects automatically.
- Every approval sheet shows which site is asking, and a site can only have one request open at a time. If the page navigates away, its open request is cancelled.
- Requests the app can't show honestly are refused outright: raw-hash signatures, the legacy
eth_sign, and typed data for a different network than the one you're on. - Both tabs keep their state while you switch around the app.
15Web link: pair with a dApp
The scan icon in the home header connects your wallet to a dApp running in a desktop browser. The dApp shows a pairing QR; scan it with Fhenix Pay and the two sides open a direct, end-to-end encrypted WebRTC channel. No server sits between your keys and the site.
- The phone stays the source of truth: the dApp can request, but every transaction is approved on the phone.
- Clear signing: requests are decoded and shown as what they actually do (recipient, token, function, amount) rather than raw hex. A request is only marked verified when it targets a token the wallet knows; for a confidential transfer, the real amount is shown when this wallet encrypted it, and an “Amount unknown” warning when it didn't.
- One request at a time: a second request can't pop up on top of one you're reading, and the approve button arms only after a moment.
- Balance-decryption permits issued to a paired dApp are short-lived, so a site can't keep reading balances long after you disconnect.
- If a session is active, the scan icon reopens its status screen, where you can disconnect at any time.
16Security
Keys on device only
The private key and recovery phrase are generated locally and stored in the OS keystore (Keychain / Keystore), encrypted at rest and kept out of backups and phone-to-phone transfers. Nothing key-shaped ever leaves the phone.
Hardware-wallet option
With a Ledger connected (§06) there is no key on the phone at all; every permit and transaction is physically confirmed on the device's secure element.
Biometric gate
Face ID / fingerprint / passcode is required to open the app, to sign or send anything (payments, shield, permits, dApp requests), to view the recovery phrase or private key, and to delete the wallet. After a minute in the background the app locks again.
Screenshot-proof screens
The recovery phrase, private key, your balances, the send and shield screens, and shared data block screenshots and screen recording at the OS level.
Clipboard hygiene
Anything you copy from the wallet (a secret, request details, a permit) is wiped from the clipboard after 30 seconds.
Pinned connections
The app only accepts the expected certificate authorities for Fhenix's own servers (the CoFHE network, pairing, and the token list), so a rogue certificate can't intercept them.
Device-integrity checks
Jailbreak / root / developer-mode detection warns you before the wallet opens on a risky device.
Amounts encrypted at source
Payment amounts are encrypted on the phone with the network's FHE public key before a transaction is even signed.
17Troubleshooting
| Symptom | What's happening / what to do |
|---|---|
| Token card shows loading dots for a long time | The CoFHE network is unsealing your encrypted balance. The first-ever unseal after a new permit can take a minute. The app retries automatically; check your connection and pull the refresh icon next to Assets. |
| Unshield finished but tokens haven't arrived | Unshield is two-step: the claim settles after threshold decryption. Watch for the Claim banner on the token card and tap it if it doesn't clear on its own. |
| “Transaction failed” when sending | Most often: no native testnet ETH for gas on the selected network. Fund the address from a faucet and retry. |
| Added a token but nothing shows | Confirm you're on the same network as the token contract; assets are tracked per network. |
| NFC / Bluetooth options don't react | Check the OS permission prompts (NFC and Bluetooth), and set a device name in Settings; it's how other devices find you for Bluetooth payments. |
| App asks for authentication and rejects it | The biometric gate falls back to the device passcode. If biometrics changed (new fingerprint, Face ID reset), unlock once with the passcode. |
| The app asks to unlock again after switching apps | Expected: after more than a minute in the background the wallet locks itself. Authenticate to continue; the screen you were on is kept. |
| A payment shows “Check the amount” | The payment request described the amount with different decimals than the token really uses. Trust the number on screen: it's what will be sent. If it isn't what you expected, back out. |
| Delegating a permit fails with an access-control error | The app couldn't read the network's access-control settings, so it refused to create a permit you might not be able to revoke. Check your connection and try again. |
| A dApp's request is refused without a prompt | Connect the site first (it asks once), make sure it's on https:// and on the same network as the wallet, and finish any request that's already open. |
| Ledger doesn't appear in the scan | Unlock the Ledger, open the Ethereum app, and fully close Ledger Live. If the device is paired in the OS Bluetooth settings, “Forget This Device” there and scan again. A system-level pairing hides it from the app. |
| Ledger rejects a signature (or errors mentioning 0x6985) | Enable Blind signing in the Ethereum app's settings on the device, then retry. CoFHE permits and confidential transfers require it. |
| Signing fails and the app says the Ledger disconnected | The device was locked, asleep, or out of range. Unlock it, reopen the Ethereum app, and retry; the reconnect dialog finds your saved device automatically. |
18Appendix
Glossary
| Term | Meaning |
|---|---|
| FHE | Fully homomorphic encryption: computing on encrypted data without decrypting it. The math behind confidential balances. |
| CoFHE | Fhenix's FHE coprocessor network: encrypts inputs, computes over ciphertexts for the chain, and runs the threshold network that seals/decrypts outputs. |
| Permit | A signed message authorizing the CoFHE network to seal a value to your key. How the app reads your own balance without exposing it. |
| Sealing | Re-encrypting a value so only your device key can open it; the last hop of balance decryption happens locally. |
| Handle / ctHash | The on-chain reference to an encrypted value. What a block explorer sees instead of your amount. |
| Shield / Unshield | Moving value from public to confidential balance, and back. Unshield settles in two steps via a decryption claim. |
| Shared permit | A read-only grant you sign so someone else can decrypt chosen confidential data until it expires or you revoke it. It can never move funds. |
| Blind signing | A hardware-wallet mode where the device signs a hash it can't decode into human-readable fields. Required on a Ledger for CoFHE permits and confidential transfers; the app's overlay tells you what each signature is for. |
Token quick reference
| Action | Dual (fUSD) | FHERC20 wrapper (cUSDC) |
|---|---|---|
| Shield | Public → confidential, in place | Deposits underlying (approve step you confirm) |
| Unshield | Confidential → public, claim step | Releases underlying, claim step |
| Public balance | Yes, shown next to private | No, confidential only |
| Private transfer | Yes | Yes |